
Installation
This section provides a step-by-step process to install each component of the StifleR platform. Whether you're evaluating via Proof of Concept or implementing a full production deployment, this is the correct order of installation to get a clean and functional environment.
We recommend when deploying 2Pint software in your environment, to initially validate against your UAT or QA environment before rolling out in production.
Testing and validation are used to confirm that StifleR operates correctly and meets expectations in your environment. A Proof of Concept can be used to verify behavior, performance, and visibility before expanding usage, and the same testing scenarios can also be applied in production environments in a controlled manner.
Before proceeding to installation, ensure that:
Order of installation
For a standard StifleR implementation, the recommended order for deploying and configuring each component is as follows:
Install StifleR Server – Core engine managing all operations.
Install StifleR Dashboard – Web UI for monitoring and configuration.
Install Action HUB – Dynamic, real-time actions across the StifleR ecosystem.
Install Beacon – Gathers telemetry and identifies active subnets.
Install StifleR Client – Client that monitors network activity, reports and enforces policies.
Install WMI Agent (optional) – Agent that replaces traditional WMI.
Install CacheR (optional) – content tracking and pre-caching.
Prerequisites for Configuration Manager
If Configuration Manager is being used as part of the PoC, the following additional setup is required. Detailed configuration steps can be found on the linked documentation pages.
BranchCache is the key Microsoft peer-to-peer technology which StifleR optimizes. It is important to enable BranchCache on all relevant systems.
If using Configuration Manager, enable BranchCache on all Servers / CM distribution points
If you have a simple lab environment, you should perform this step (if required) on all your distribution points
If you are planning on testing in a production environment, make sure that you perform this step ONLY on the relevant distribution point your test clients will obtain their deployment content from.
As well as BranchCache, StifleR can utilize download jobs which use Microsoft's Delivery Optimization (DO) peering technology.
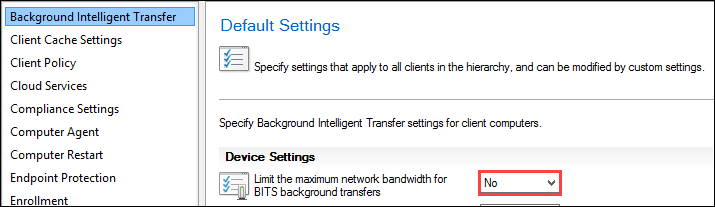
Check for and remove any BITS policy that has been set within Configuration Manager and/or Active Directory. Such settings can interfere with the efficient operation of the automated Bandwidth mechanisms in StifleR.
In the Configuration Manager console, BITS settings can be configured in "Client Settings":
Remove any BITS AD Group Policy (if configured) Within the Active Directory Group Policy Editor, go to: Computer Configuration -> Policies -> Administrative templates -> Network -> Background Intelligent Transfer Service (BITS)
Ensure that there are no BITS policies configured. If present, remove them to avoid affecting any test clients.
Configure target bandwidth
Configure subnet description
Configure Delivery Optimization
Upgrading from 2.10 to 3.0
If StifleR was previously installed to a custom destination path, version 3.0 will ignore that location and install to the default path C:\Program Files\2Pint Software. If you need to continue using a custom installation path, you must first uninstall StifleR version 2.10 before installing version 3.0.
The SQL Server download database must be recreated as an empty database for new data to be populated and appear correctly.
Upgrade instructions
Stop StifleR
• On the existing server, stop the StifleR Service.
• Confirm it is fully stopped before proceeding (StifleR.Service.exe is not running, and service status is Stopped).
Note: Your database locations may be different if you have configured different path(s) in StifleR.Service.exe.config per this guide: Moving the StifleR Server Databases to a New Drive on the Same Server | StifleR 2.10 | Product Documentation
Back up files, registry and data
Make backups of:
Databases (all StifleR-related DBs):
C:\ProgramData\2Pint Software\StifleR\Server\Databases
Install paths (entire folders), especially:
C:\Program Files\... (default location)
Keep these backups together and clearly labeled (server name + date).
Uninstall old components
Uninstall the StifleR Service
Uninstall the StifleR Dashboard
Install StifleR Server
Install the StifleR Service.
Use your backed-up config file from Program Files to retrieve/restore config key items
Reapply previous customizations (from 2.10)
Open the Configuration Editor.
Re-implement any customizations you had in 2.10. (settings, groups, paths, ports any non-default tuning)
Use the backed-up config file as your reference for what to carry over (settings, groups, paths, ports any non-default tuning).
Install StifleR Dashboard and set up IIS manually
Install the StifleR Dashboard.
Manually configure IIS for the dashboard:
Create/assign the site (or application under a site)
Configure bindings as needed (host header, port, TLS if applicable)
Ensure the app pool identity and permissions match your security approach
Install StifleR 3.0 components
Install Action Hub/Beacon/WMI Agent.
Through Infrastructure Services in the StifleR Dashboard, confirm component(s) connect successfully.
Through Infrastructure Services in the StifleR Dashboard, approve the StifleR component.
Quick validation and cleanup checklist (recommended)
Service starts cleanly on the new server
Dashboard loads and authenticates correctly
Admin groups behave correctly (access control)
Action Hub is installed and functional
(If applicable) remove/clean up any old IIS site/app pool entries related to the dashboard only after you’ve confirmed you have backups.
Last updated