
StifleR Client installation
This is the StifleR 2.14 (current) release documentation. For other versions, please select the Drop Down list at the Top Left and select the correct version.
Prerequisites
Windows 10 or later
Windows Server 2016 or later
Supported are x86 or x64 versions of the operating systems (x86 for Windows 10 only)
Professional, Enterprise, Education, or LTSC editions for client operating systems
Microsoft .NET 4.8 must be installed
Installation
Manual installation
From an elevated command prompt launch StifleR.ClientApp.Installer64.msi.
At the "Welcome" screen, feel welcomed, and then click Next.

At the "End-User License Agreement" screen, once you have reviewed the EULA, check the box: I accept the terms in the License Agreement, and then click Next.

At the "Destination Folder" screen, enter the path to the directory where the StifleR Client program files will be installed and then click Next.

At the "Ready to install..." screen, click Install to begin the installation.

At the "Completed" screen, the installation wizard is complete. Click Finish and enjoy a nice glass of craft beer, you’ve earned it.

After finishing installation, the configuration tool will open. Enter the URLs and settings.

Unattended installation
With StifleR 2.14 there is an option to install StifleR Client unattended.
To take advantage of this option you will need to install one client using the manual approach. After completion, you will be able to export the settings that you have configured into a .2psimport file.
To export the file – which you can then use to import for unattended installations – launch the Client Configuration Editor located here:
C:\Program Files\2Pint Software\StifleR Client\TwoPint.ConfigEditor.Wpf\TwoPint.ConfigEditor.Wpf.exe
Once the editor is open, customize the settings for the environment then go to Export -> Create 2PS import file for MSI only, and save it with a filename such as: settings.2psImport.

This file will contain the required settings in custom JSON format, where any string value containing " " (space) is replaced with "%20", and final output is stripped of all " " (space); here is an example:
In order to use this configuration together with an MSI installer, you will need to add the OPTIONS= parameter
Alternatively, if you add the 2psimport file into your source content, you can call it directly as in this example:

When installed manually, once complete the installer will launch the Configuration Editor. After the settings have been confirmed, the Configuration Editor will set the service to "Automatic Startup" and then start it.
In unattended mode, to start the service when completed, pass the parameter AUTOSTART=1 to MSI. Note that this parameter will only be used in unattended/quiet or basic mode, and project has Config Editor support.
Post installation
Service status
Open services.msc to validate that the 2Pint Software Stifler Client service is installed and running. Alternatively, run the following PowerShell command and validate that the service is present and running:
Validate the following output:

Event logging
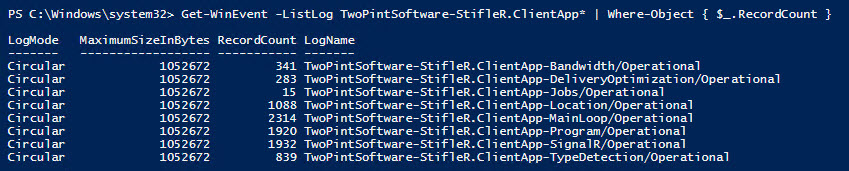
To validate that the StifleR Server event logging structure has been created, execute the following PowerShell command:
Validate the following output:
Last updated