
StifleR Server installation
Prerequisites
Review StifleR Server Requirements page for server specifications, etc.
Open the required firewall ports
Create and populate the StifleR Administrative Security Groups
Activate Microsoft .NET 4.8
Provide installation account with Administrator rights
Enter license key (optional at this point)
Decide on whether the StifleR Service will be using SSL (optional at this point, but recommended). For more information on using SSL, see this page.
Optional components
Internet Information Services (IIS):
The StifleR Server API runs its own web service, so IIS is NOT required unless:
You will be hosting the StiflerRulez site on the same server.
Installation
From an Elevated Command prompt launch StifleR.Installer64.msi. You also can launch installation as it is – the installer will ask for elevation when needed.
At the "Welcome" screen, feel welcomed, and then click Next.

At the "End-User License Agreement" screen, once you have reviewed the EULA, check the box: I accept the terms in the License Agreement, and then click Next.

At the "Destination Folder" screen, enter the path to the directory where the StifleR server program files should be installed and then click Next.

At the "Ready to install..." screen, click Install to begin the installation.

At the "Completed" screen, the installation wizard is complete. Make sure that checkbox on the bottom left is set to Launch Configuration Editor. Click Finish and enjoy a nice cup of tea, you’ve earned it.

After you press finish, a new configuration window will pop up. To get started, you will need configure several items:
Groups with full Administrator access to StifleR
Groups with Read access to StifleR
StifleR Server license key
SignalR endpoint certificate thumbprint
Web Service endpoint certificate thumbprint
There may be other items to configure, based on your environment. Toggle over to "Show advanced" to see all of those other items.
Note: The Administrators groups are not created automatically. They must be created in advance. Please refer to the StifleR Administrative Security Groups section.


Note: If using a local or domain account, the account must have "Logon as a Service" rights.
Aftrer configuring critical settings, please click the Verify button. After verification is complete, press the Save button to save all settings and start the StifleR service.
Post-installation checks
Checking the StifleR service state
Open services.msc to validate that the 2Pint Software Stifler Server service is installed and running, or run the following PowerShell command and validate that the service is present and running:
Checking the StifleR installation directory
If using a licensing file for licensing, check for the License.nfo files. If this is missing the service may not be licensed properly.
Open up the configuration file, StifleR.Service.exe.config, and check that the expected values are present.
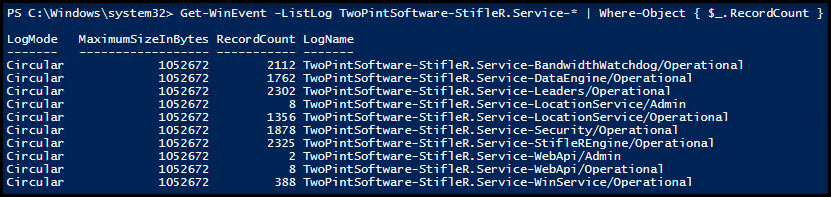
Checking the event logs
To validate that the StifleR Server Event Logging structure has been created, execute the following PowerShell command:
Validate the following output:
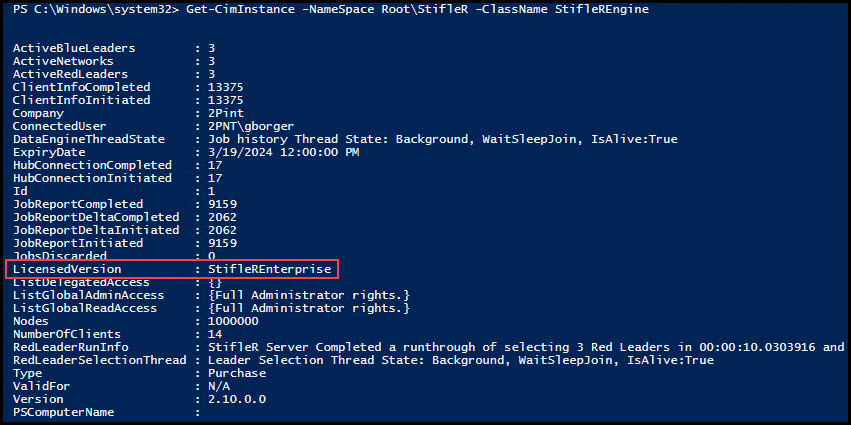
Checking WMI configuration
Execute the following PowerShell command to verify that the WMI Class Root\StifleR and methods were created successfully:
Validate the following output:

Execute the following PowerShell command to get the StifleR License information:
Validate the following output:
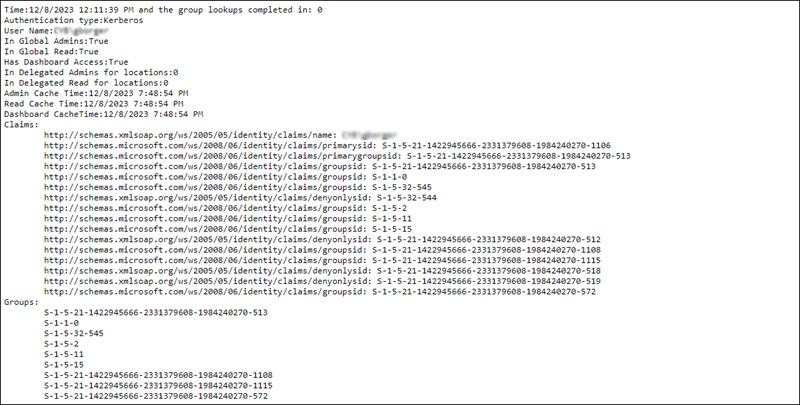
Checking API permissions
To test access to the StifleR Server API, open a web browser, and enter the StifleR Server URL such as:
http(s)://servername:9000/api/test
The page should display the results of your permissions as in the example below:
Checking StiflerRules website availability
To learn more about this file see: StifleRulez.xml Configuration Guide
This file is hosted on GitHub, but you can also host it yourself on the same server that will host the Dashboard. If you'd like to host it in your environment, follow the instructions in the StifleRulez.xml Configuration Guide.
Last updated