> For the complete documentation index, see [llms.txt](https://documentation.2pintsoftware.com/llms.txt). Markdown versions of documentation pages are available by appending `.md` to page URLs; this page is available as [Markdown](https://documentation.2pintsoftware.com/deployr/task-sequences/setting-the-computer-name.md).
# Setting the computer name
DeployR automatically generates a computer name. To use your own naming standard, set the [`COMPUTERNAME`](/deployr/reference/task-sequence-variables.md) variable before the **Apply OS** step in WinPE, or use the `Rename-Computer` function in the full OS.
**Windows PE:** The temporary computer name begins with `OSD`.
**Apply OS:** If `COMPUTERNAME` is not set before the Apply OS step, the default `Defaults.json` template is used: `PC-%RAND:10%`. Setting `COMPUTERNAME` before this step overrides the default. Windows computer names are limited to 15 characters.
### Using PowerShell:
See the [**Set Computer Name with Script**](/deployr/automation-and-powershell/scripting-for-osd/simple-prompt-for-computer-name.md) example. It sets the task sequence variable to the name you want to assign to the computer.
```powershell
${TSEnv:ComputerName} = 'CUSTOMNAME' # 15 characters or fewer
```
### Using Set variable step
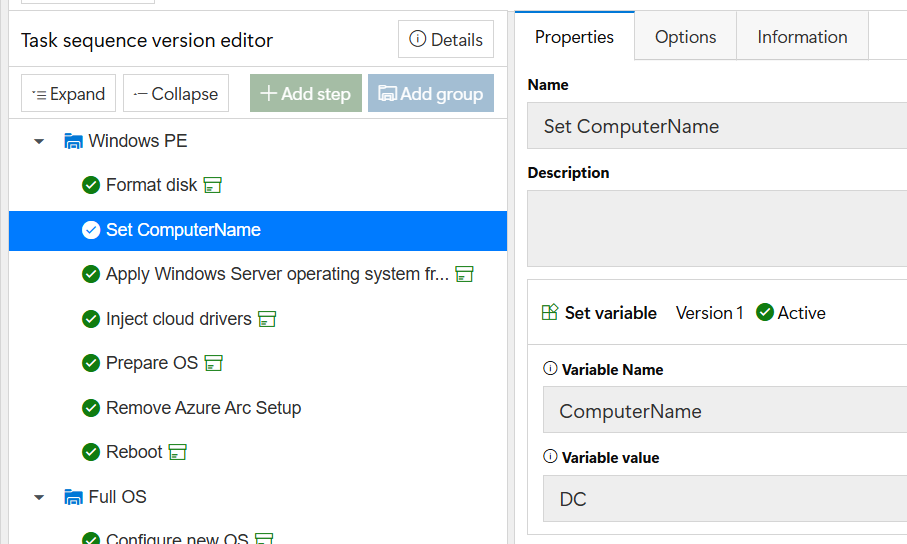
You can also use a **Set variable** step to assign the computer name. In this example, the computer is named `DC`, which would not normally be recommended. However, this task sequence creates the lab's domain controller, so the name is appropriate here. In general, using a fixed value in a **Set variable** step is not recommended because the same name would be assigned every time. A script can instead generate a name based on the serial number, asset tag, or other device-specific information.
Notice that the variable is set before the "Apply Windows..." step, so that the task sequence uses the variable in the unattend file.
### PowerShell Function Rename-Computer in Full OS
Use the built-in PowerShell `Rename-Computer` cmdlet after the device has booted into the full OS. This is useful for Hyper-V lab machines, where the VM name can be retrieved and assigned as the computer name. See the example below.
```powershell
function Get-HyperVName {
[CmdletBinding()]
param ()
if ($env:SystemDrive -eq 'X:'){
Write-host "Unable to get HyperV Name in WinPE"
}
else{
if (((Get-CimInstance Win32_ComputerSystem).Model -eq "Virtual Machine") -and ((Get-CimInstance Win32_ComputerSystem).Manufacturer -eq "Microsoft Corporation")){
$HyperVName = Get-ItemPropertyValue -Path 'HKLM:\SOFTWARE\Microsoft\Virtual Machine\Guest\Parameters' -Name "VirtualMachineName" -ErrorAction SilentlyContinue
}
return $HyperVName
}
}
function Set-HyperVName {
[CmdletBinding()]
param ()
$HyperVName = Get-HyperVName
Write-Output "Renaming Computer to $HyperVName"
Rename-Computer -NewName $HyperVName -Force
}
try {Set-HyperVName}
catch{}
```
### Offline Domain Join
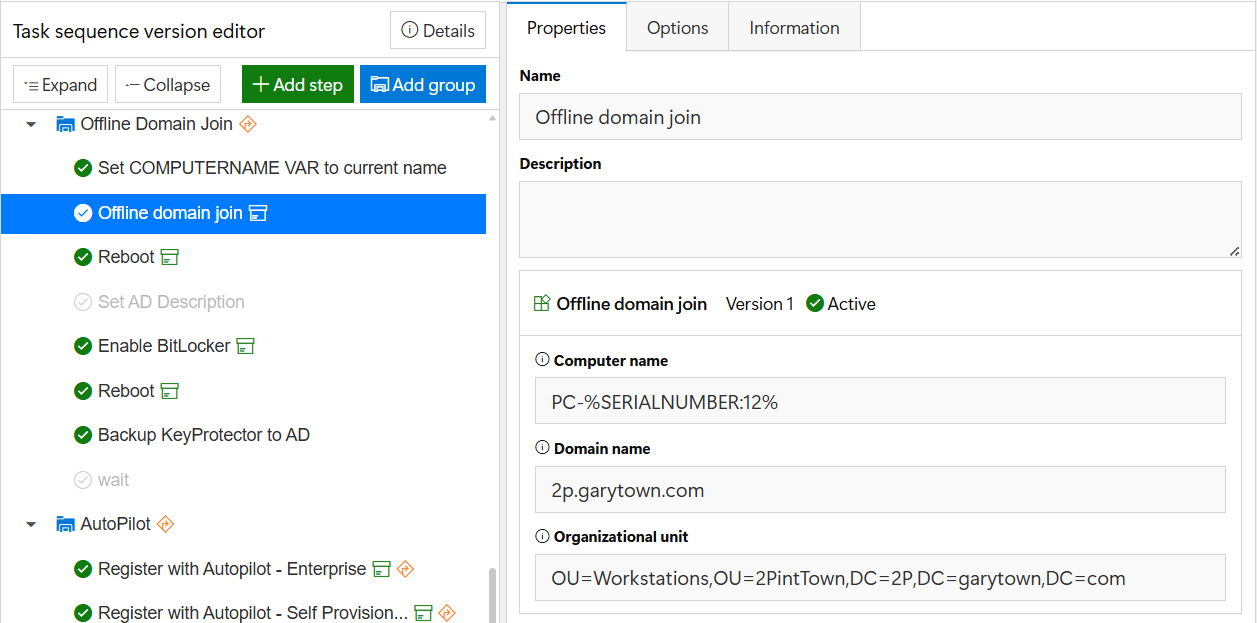
If you are using offline domain join, make sure you set the COMPUTERNAME variable before the Offline Domain Join step; otherwise, it defaults to the naming pattern set in that step, which is the serial number. If you have pre-set the COMPUTERNAME variable, the Offline domain join step will honor that variable and not change it to the %SERIALNUMBER% variable. Note that a serial number longer than 15 characters breaks the process, so use something like PC-%SERIALNUMBER:12%, which sets a prefix of PC- followed by the first 12 characters of the serial number.
{% hint style="info" %}
Computers that are members of an Active Directory domain cannot have names that contain only numerals. This is a DNS restriction. For more information: [Microsoft naming conventions](https://learn.microsoft.com/en-us/troubleshoot/windows-server/active-directory/naming-conventions-for-computer-domain-site-ou)
{% endhint %}
---
# Agent Instructions
This documentation is published with GitBook. GitBook is the documentation platform designed so that both humans and AI agents can read, navigate, and reason over technical content effectively. Learn more at gitbook.com.
## Querying This Documentation
If you need additional information that is not directly available in this page, you can query the documentation by asking a question.
Perform an HTTP GET request on the following URL with the `ask` and `goal` query parameters:
```
GET https://documentation.2pintsoftware.com/deployr/task-sequences/setting-the-computer-name.md?ask=&goal=
```
`ask` is the immediate question: it should be specific, self-contained, and written in natural language.
`goal` is what the user is ultimately trying to achieve, the reason they need the answer. Sharing it helps GitBook give you a better, more relevant answer. A goal is most helpful when it describes the outcome the user wants rather than restating the question. For example, with `ask=how do I create an API token`, a goal like `automate deployments from our CI pipeline` lets GitBook tailor the answer to that use case.
The response will contain a direct answer to the question and relevant excerpts and sources from the documentation.
Use this mechanism when the answer is not explicitly present in the current page, you need clarification or additional context, or you want to retrieve related documentation sections.