> For the complete documentation index, see [llms.txt](https://documentation.2pintsoftware.com/llms.txt). Markdown versions of documentation pages are available by appending `.md` to page URLs; this page is available as [Markdown](https://documentation.2pintsoftware.com/deployr/quick-start/bare-metal-with-hyper-v.md).
# Bare Metal with Hyper-V
Hyper-V is a convenient way to start testing your DeployR environment. Copy the DeployR ISO file from the `boot` folder to your Hyper-V host, then boot a Hyper-V virtual machine from that ISO.
#### Hyper-V VM recommendations and requirements
* Gen2 VM
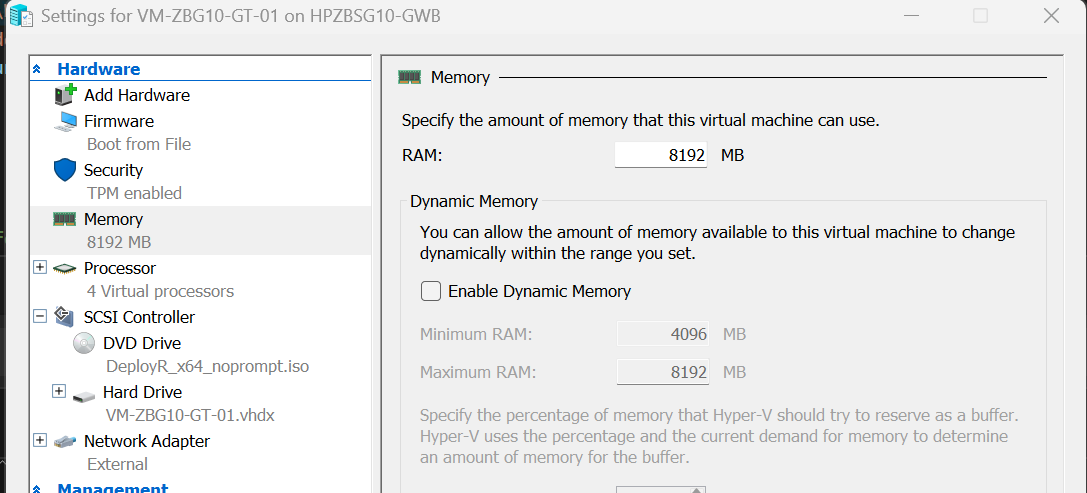
* 8 GB memory (4 GB minimum for basic client OS testing if resources are constrained).
* **Important: Disable Dynamic Memory.** This is a common cause of the **Apply OS** step failing: Hyper-V may reclaim memory, leaving the VM without enough memory to apply the image.
* 4 Virtual CPUs
* Default storage sizes are fine, but feel free to adjust them.
* Ensure the VM has network connectivity to the DeployR server
* Set the DVD to the DeployR Boot ISO
The following PowerShell script creates a VM for you.
```powershell
$VMName = "VM-OSD-01"
$VMPath = "C:\HyperV"
$BootISO = "C:\HyperV\DeployR_x64_noprompt.iso"
[int]$ProcessorCount = 4
[int]$StartingMemory = 4 #GB
[int]$DriveSize = 100 #GB
$VMSwitchName = 'External'
#=====================================================
$VMFolder = Join-Path -Path $VMPath -ChildPath $VMName
$VHDxFile = Join-Path -Path $VMFolder -ChildPath "$VMName.vhdx"
$MemoryBytes = $StartingMemory * 1024 * 1024 * 1024
$DriveBytes = $DriveSize * 1024 * 1024 * 1024
$NewVM = New-VM -Name $VMName -Path $VMPath -MemoryStartupBytes $MemoryBytes -BootDevice CD -SwitchName $VMSwitchName -Generation 2
Set-VMMemory -VMName $VMName -DynamicMemoryEnabled $false -StartupBytes $MemoryBytes -ErrorAction Stop
$NewVHD = New-VHD -Path $VHDxFile -SizeBytes $DriveBytes -Dynamic -ErrorAction Stop
Add-VMHardDiskDrive -VMName $VMName -Path $VHDxFile -ErrorAction Stop
Set-VMSecurity -VMName $VMName -VirtualizationBasedSecurityOptOut:$false
Set-VMKeyProtector -VMName $VMName -NewLocalKeyProtector
Enable-VMTPM -VMName $VMName
Set-VMProcessor -VMName $VMName -Count $ProcessorCount
Set-VMVideo -VMName $VMName -ComputerName $env:COMPUTERNAME -ResolutionType Single -HorizontalResolution 1600 -VerticalResolution 900
Set-VMDvdDrive -VMName $VMName -Path $BootISO
```
For more advanced automation, use this script, which includes additional checks and parameters.\
### Secure Boot, Hyper-V and iPXE
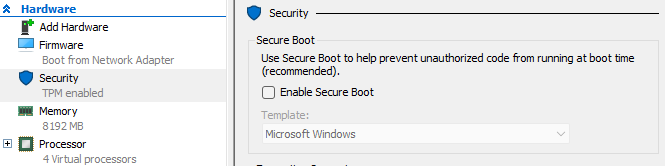
**Disable Secure Boot** for iPXE:
... and here is why...\
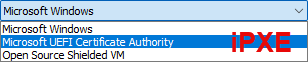
the iPXE binary is signed by Microsoft's UEFI Certificate Authority (for third parties), which is different from the standard Windows Secure Boot certificate. Most devices trust both, but Hyper-V does not: you have to pick one or the other, which does not work well for iPXE.
This creates a catch-22. If you select the **Microsoft UEFI Certificate Authority** template, iPXE will boot with Secure Boot enabled. However, the WinPE image is not signed with that certificate authority and requires the **Microsoft Windows** template. The Secure Boot authentication will therefore fail when WinPE loads.\
\
This Hyper-V limitation does not exist in VMware or on physical devices. If you are testing with Hyper-V and iPXE, disable Secure Boot (clear the "Enable Secure Boot" check box).
---
# Agent Instructions
This documentation is published with GitBook. GitBook is the documentation platform designed so that both humans and AI agents can read, navigate, and reason over technical content effectively. Learn more at gitbook.com.
## Querying This Documentation
If you need additional information that is not directly available in this page, you can query the documentation by asking a question.
Perform an HTTP GET request on the following URL with the `ask` and `goal` query parameters:
```
GET https://documentation.2pintsoftware.com/deployr/quick-start/bare-metal-with-hyper-v.md?ask=&goal=
```
`ask` is the immediate question: it should be specific, self-contained, and written in natural language.
`goal` is what the user is ultimately trying to achieve, the reason they need the answer. Sharing it helps GitBook give you a better, more relevant answer. A goal is most helpful when it describes the outcome the user wants rather than restating the question. For example, with `ask=how do I create an API token`, a goal like `automate deployments from our CI pipeline` lets GitBook tailor the answer to that use case.
The response will contain a direct answer to the question and relevant excerpts and sources from the documentation.
Use this mechanism when the answer is not explicitly present in the current page, you need clarification or additional context, or you want to retrieve related documentation sections.